Background

Thursday, December 31, 2009

A Friendly Card

For Christmas my sister-in-law had given me the cartridge A Child's Year. I hadn't really seen this cart and have been very pleased with it. Today I decided to try a new challenge from The Pink Elephant #47.

This sketch had me rummaging around my scraps trying to come up with an idea. At first I found the flowered paper. I really like the colors and wanted to use it. I put all of the papers together and still could not find the right stamp image I wanted to use.

I started browsing my cricut carts and found the perfect image for this card in ACY. It reminds me of the little girl on the salt container :) I thought of a friend of mine and knew this would be just right for her.


Thanks for visiting. Have a blessed day!

Tuesday, December 29, 2009

A Note for You

Tonight I decided to check out the challenge on 2S4Y. Laura has provided a great sketch 42.


I decided to go with a black and white theme. I crumpled up some tissue paper and adhered it to white card stock. I used a Fiskars border punch on black cardstock and tied some ribbon from my stash. I used my cuttlebug to cut out the note and stamped the sentiment.
Thanks for looking and Happy New Year!

Fish Hatchery Layouts

Although I would like to be one that is completely caught up on scrapbooking my favorite photos I have resigned myself to being behind - always. I sort of like it. In creating these pages from April 2007 I was able to revisit a fabulous outing that I took with my family, a friend and her two children.

We started at the playground where the children (ages 16 months to 2 years) loved the slide. Fisher was all about climbing up the steps. You can even get a glimpse of Dad taking Fisher down the slide. We followed this sliding adventure with a visit to the fish hatchery. There the children got to feed the fish. They squealed with delight every time they threw the food in because the fish would just splash the water in a feeding frenzy.

So the first layout is of the slide. I used the Locker Talk cartridge to cut out the slide and Plantin Schoolbook to cut out the lettering. (Thanks to my DH for the cricut jukeboxes for Christmas. I can now cut from different carts without turning the machine off.) I used a journaling block I received in a swap. I feel it needs a little more but I am not sure what. So for now the 2 page layout is complete.


For the second layout I used A Child's Year cart to cut out the fish. I had taken pictures of the different fishing signs at the hatchery and used those as embellishments. I am pleased with this layout. I particularly like the picture of Fisher standing by himself. He has grown so much it is hard to remember him that small. That is why I love scrapbooking and pictures. The memories are priceless. Anyway, here is the 2 page layout.
Thanks for taking a look. Have a blessed day!

Christmas Card

It has been a while since I posted anything new. Actually it has been months. The new teaching position, graduate school, and every day life take priority so I have had little time to take a retreat. I did find time to make Christmas cards and I wanted to share them with all of you.

I treated myself to three new seasonal Cricut cartridges. My favorite is When Its Cold Outside which has fabulous snowflakes. I chose the nativity snowflake for my cards. I wanted to keep it simple. I did emboss the background with my cuttlebug using the Swiss Dots folder. I did a few with the snowflake folder. I preferred the snowflakes but I didn't take a picture of those before I mailed them off. I added a touch of silver glitter on the star and wrapped some blue ribbon from my stash.
I do hope you had a very Merry Christmas and may the Lord bless you and your family throughout the New Year!

Saturday, September 19, 2009

A Birdie Wedding

Last night I had the chance to visit with a cousin of mine. We enjoyed a meal and great conversation. Our plan was to scrapbook but we talked more than anything else. While we chatted I was able to make a card for a Bridal Shower I'll be attending in a few minutes.
I used Kazan's Sketch 35 as my guideline and I am quite pleased with the outcome. I used my Home Decor cricut cartridge to cut out the two birds and the branch. I embossed the bottom piece with my cuttlebug. I then puched out tiny flowers with a punch. After assembly I felt the card needed a little bling. (After all it is for a wedding.) I added the jewels for the center of the flowers and a little sparkle to the birds.


Wednesday, September 16, 2009

My Friend

I found a new challenge site that has inspired me. Emma at Allsorts has created a challenge this week to include her sketch with a two color combo.

I decided to use teal and rust which went well with the patterned paper I found. I really like this little girl. She came outfitted with a watering can, wheel barrow, and birdhouse. I used my cuttlebug to emboss the flowers on the side.

Thank you for taking a look and have a great day!

Saturday, August 29, 2009

Time to Bloom

I have had a great week. With the start of new school year at a new school I was unsure of how things would go. I should have known that God would have it all in control and had placed me in a wonderful place. I am no longer getting lost as I go from my classroom to the office and I have enjoyed getting to know so many new people.

This morning I decided to drop in at some of my favorite blogs. (You can check them out on the toolbar to the right.) Of course I was challenged again by 2S4Y. Laura provided the sketch for this week.

While Shea and Fisher were off to the store and before the Sunday School picnic I had some time to relax and make a card.

As I was going through my scrap pile I found this fabulous green polka dot paper. I paired it with some green lace on brown card stock.

I used the Home Decor cartridge to cut out the filigree piece and backed it with a shadow. I also cut out the dragonfly from the same cart.

The circle chipboard piece was just the right size but the colors didn't match. That is when I spotted the metallic BLOOM sticker and it was just made to fit. I was then inspired to use soda can for the metal strip which I embossed with my cuttlebug. I used some flowers and a square jeweled brad to accent the bottom corner. I love the way the colors came together. Enjoy and thanks for looking!

Wednesday, August 19, 2009

Kazan's Sketch 33

There are some beautiful cards on the 2 Sketches 4 You site inspired by Kazan's sketch. I decided to try my hand at creating a card based on her design.


I used my cuttlebug to emboss the background card and then highlighted the raised images by dabbing my ink pad straight onto the paper. Next, I used my 'victorian' decorative scissors to cut the border on the gorgeous rose paper I found in my stash.


The butterfly has become one of my favorites acrylic stamps. I cut a circle and then trimmed the bottom. I stamped the butterfly on it and distressed the edges. Finally, I added ribbon and buttons. It was a great way to spend some time this morning before Fisher wakes up. Have a blessed day!


Saturday, August 15, 2009

A Teacher's Gift

What a day!! Fisher and I got up early to go to the Teacher Appreciation Days at several of the office supply stores. We definitely enjoyed the free sausage biscuit and chocolate milk along with the giveaways. I got things for the start of the school year like pencils and paper. I also got the supplies for the fantasy football draft next Saturday. For those of you who know my husband and I, you know how serious we are about our FF.

In timely fashion, Bitten by the Bug, is hosting a contest to create something for Back to School. Since Fisher will be starting preschool this year I thought it would be a great time to create a nice little gift for his teacher. The 'boys' went to the creek today with some friends so I had a couple of hours to play and create. I started with a plain cardboard box I had kept from some packaging of something. (I knew it would come in handy one day). I also wanted to use my Locker Talk cricut cartridge along with a new technique I saw online while at the beach.

The technique is to use gel pens in the cricut to draw instead of the cricut markers. While shopping today I found these small gel pens and pencil grips which hold the pens in place in the cricut. The paper on the gift box was first drawn with a gel pen by the cricut and then I cut it out using the shadow. I also did this on the Back to School circle for the side and the ruler. I am so excited that it worked so well.


After creating the box, I had to decide what to put in it. The gel pens fit nicely into the side compartment and a set of post it notes on the other side. I placed a small chocolate treat (m&ms) in there and topped the box off with a tag saying "A Special Note for You".
Now off to my next project. I have three bulletin boards in my new classroom that desperately needs some cricut attention. Have a great Back to School everyone.

Friday, August 14, 2009

Tri-Shutter Card

As I was lounging the days away at the beach last week I spent time on some great website. I was inspired by many and couldn't wait to get home to try some of the new techniques I had seen. One of them was a Tri-Shutter Card by Bonnie Szwalkiewicz. A tutorial for this card can be found at http://www.splitcoaststampers.com/resources/tutorials/trishuttercard.

My grandmother has not been feeling well and I want to send her a little pick me up. This card is for her. I used a variety of techniques. On the long pieces I did some paper piercing. (I can see why a template for that would be useful.) I punched the tag with a CM punch and then distressed the edges before stamping and attaching the paper flower. The three flowers on the inside are from an inchie swap. I also used some of my new acrylic stamps from Imaginisce. I plan on writing a brief note on the center piece above the ribbon. I hope you enjoy the card. I know I enjoyed getting back to making it.

Thursday, August 6, 2009

MIA in July

I have been amiss this past month. July turned out to be a very busy month. I spent three weeks in staff development workshops and a week seeking a new job. For the past 11 years I have been teaching math at an alternative high school for students at risk of dropping out of school. I enjoyed my work there and the students are very special to me; however, the time has come for me face new challenges. This next school year I will be at a comprehensive high school teaching math. I am excited and just a little anxious about the new school year. I am headed to the beach for a week to rest and relax with my family. I hope to return with a renewed energy and time to endulge myself a little with some cardmaking and blogging.

To all who have prayed for me and encouraged me - thank you!

God Bless All!
Karen

Thursday, June 18, 2009

2S4Y Sketch 28

As soon as I saw Laura's sketch I automatically thought of windows. I used a template to cut out the two windows, stamped the roses and butterfly with Staz On black ink, and then used glitter to color the images.


I enjoyed making this card because I used items I have had for years but rarely use. The rose set is from one of the first Hero Arts sets I purchased when I first started stamping 1o years ago. Don't you just love the sentiment???

Hope you enjoy the card. Thanks to Laura for the inspiration.


Cuttlebug Be Inspired #36 Father's Day Card

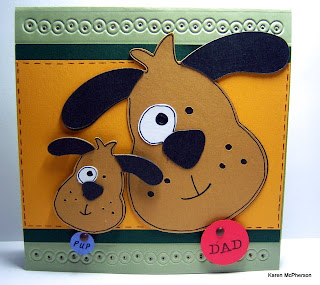
Fisher and I had a chance this morning to create a Father's Day card. He picked out the dog from the Doodlecharms cart. He then helped me emboss the top and the bottom with the Cuttlebug. He enjoys making cards with me and I enjoy having his "help."

Sunday, June 14, 2009

End of the School Year

The end of the school year has arrived and it is full of changes. My husband asked me to make a card for one of the retirees at his school. Her plan is to go camping with her husband. I used the Going Places new cricut cartridge I got for Mother's Day from Fisher to cut out the campers. I don't often make this size card but was inspired by a card I had seen earlier.


Next I made a card for one of the retirees at my school. I used my cuttlebug to emboss the leaves and to cut out the stamp looking tag. I really liked the background paper that looks like postcards.
The last few cards I made were for the graduates. I coordinated the school colors for each graduate; however, I am only posting one. I used the Locker Talk cricut cartridge to cut out the square card then layered the graduation cap on top. I also cut out the graduation tag with the same cart. I embossed vellum paper with the cuttlebug to layer behind the cap and lined the inside with coordinating card stock. I even cut out coordinating envelopes. This was my first use of the card feature on the cricut. It was super easy.

Saturday, June 6, 2009

2 Sketches 4 You 1st Anniversary

2 Sketches 4 You is celebrating their 1st anniversary with the Ultimate Card Showdown. With this being the last full week of school I have been swamped. Today I got the chance to sit down and create. Ahhhhhh.....


So here is my take on the sketch. The vintage girl is from the Florals & Nature book by Memories for a Lifetime. I used my Cuttlebug to emboss the metal background. I added some pretty paper flowers and used metal brads for the centers.


Here is the next layer.


Sunday, May 31, 2009

Wedding Card


In the past two weeks I have been to two weddings. Here is a card a made for a young man Matthew and his new bride Brittany. This is actually the card I gave them at their wedding shower. I made this using my Cricut. I cut the hearts and flowers from the Home Accents cart. My inspiration for this card came from one of the many magazines I own.

My first post...

I have been a card maker for at least 10 years but I recently found the community of card makers online. I started this blog so I could post my cards and share my love of this craft with others. Hope you enjoy and thanks for visiting.