Background

Monday, October 29, 2012

Classroom Halloween Treats

October has been a very busy month and last week was the busiest. I started with staff development for all of the high school math teachers in my county on Monday. A PLC session for Course 1 teachers on Tuesday. Then I traveled to the state Math Leadership Conference on Wednesday, followed by the state math conference on Thursday & Friday (of which I had a part in planning). I also presented two sessions. Saturday I coordinated the Fall Festival at the church consisting of a Trunk or Treat, hot dog supper, hayride and bonfire. On top of all that I started getting sick. Spent the entire day in bed on Sunday and went to the doctor today.

Feeling much better, I finished the classroom treats for my son's classroom. I found this idea on Pinterest and my son thought it was hilarious. Using a large container of cheese puffs, we filled small snack bags. (We also discovered that our little dog loves cheese puffs.)


I used Frank's Friends Alpha from Lettering Delights for the pumpkin and designed the entire card in Inkscape. I imported into Silhouette Studio, enclosed with a rectangle, filled the page, and did a print and cut.


I couldn't resist the second project. (Again, I pinned it on Pinterest.) I purchased mandarin oranges in individual containers and used a Sharpie to draw faces.

That's all the projects I have for today. I have a few planned tomorrow for my colleagues. Thanks for dropping by and have a blessed day!

Thursday, October 11, 2012

Dig for a Cure

One of the teachers I work with is a volleyball coach. This Saturday, her team is having a fundraiser called Dig for a Cure. Last week I ordered six pink water bottles for $1.50 each from WOOT.com. I wasn't sure at the time what I was going to do with them but I knew I could use them for something. (Oh, this could get very bad if I do this too often.) Fortunately, they aren't sticking around for too long. I used MTCs pixel trace of a ribbon I found by searching Google Images. I cut the ribbon and the words out of vinyl and put them onto the bottles. The plan is to put a t-shirt inside and sell them this weekend as part of the fundraiser. 

I like the way they turned out. Thanks for stopping by and have a blessed day!

Sunday, September 30, 2012

A Little Old and A Little New

My mother-in-law's birthday was yesterday and I actually had some free time to craft. My father-in-law had asked me to create a card for him to give to her and of course I had to make one from us. This first card is the one I made for my father-in-law to give to her. The "little old" is the use of the phrase "live, laugh, love." It's one of my favorite phrases to use because I find it suitable for a variety of situations. The "little new" is to challenge myself to use MTC to weld the words together instead of using my stamp. The flowers are also a new purchase from the local store.
 

This second card is the one from us. The "little old" is the flower stamp which I have had for years and is well used. The "little new" is the sewing. I do not sew but love the look on cards. I found a simple crafters sewing machine for $9 and thought I would try it out. I used Spectrum Noir alcohol markers to color which is still a technique I want to get better at.

Thanks for stopping by and taking the time to look.
Have a blessed day!

Sunday, September 23, 2012

A Sympathy Card

My SILs mother passed away this past week and I wanted to make a special card for her. I was inspired by Jin Yong's post on Simple Shapes at Under A Cherry Tree.
The entire project was done with MTC and cut with my Silhouette Cameo. I started with a 3" and a 2.5" square, stacked them, and did a Boolean Join. Next, I copied and pasted (in place) three other squares. I overlapped them slightly and welded them together. The words are Script MT Bold font with the letters welded together. I placed the words just touching the frame and did another weld. The butterfly is from LDs  Cloud Nine set. I created a shadow with blackout and was finished within a few minutes.

On the inside I printed "... and the greatest of these is love." to complete the verse from 1 Corinthians 13. The bling was put on with my irock tool.

I know it has been awhile since I posted so I don't know if anyone out there even reads these posts; but if you do, thanks for letting me share. If you are so inclined please pray for my SIL. This was sudden and she needs to feel God's strength to help her through.

Have a blessed day!

Wednesday, June 6, 2012

End of Year Teacher Treats

I am so proud of Fisher. He got the Excellence in Reading & Math yesterday at the end of the year awards ceremony. He was so excited about finishing Kindergarten and of course starting summer vacation. I am in awe of how well he is reading. I can teach high school students math but am amazed at how elementary teachers teach students how to read.

To show my gratitude I made his teachers and the ladies in the office some end of the year treats. For the ladies in the office I put together this apple from the Fall Harvest Favor Box from SVG Attic and placed two small caramel brownies inside. (Unfortunately I didn't take the best pics so it is difficult to see that they are apples.)
For his teachers, I made these cute flip flop boxes from My Graphico. They were easy to assemble. I placed two caramel brownies in each of these too.


Thanks for stopping by and I hope you have a blessed day!
Monday, May 28, 2012

So Sweet

Happy Memorial Day! I am thankful for the men and women who have sacrificed their lives for this country. May they always be remembered.

Now the card I would like to share. I have been working on this for a few days. I want to get better at coloring with my Spectrum Noir Markers so I have colored this little girl with a watermelon from Kristie Daily multiple times. 
I used the sketch Mojo Monday 243 

Thanks for stopping by. Have a blessed day!

Saturday, May 26, 2012

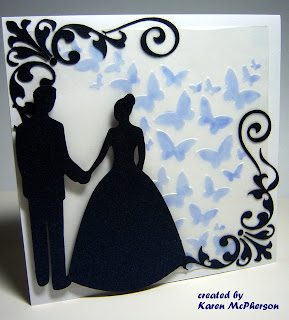
Bride & Groom Wedding Card

One of the young ladies from our church got married today. I wanted to make her an extra special card. I decided to use Patricia Zapata's Ring Box Cut It from Lettering Delights. I used my Silhouette Cameo and Make the Cut. The top of the box is backed with a piece of colored vellum.
The lace is from the $1 bin at AC Moores and was wrapped around the edge. White self-adhesive pearls were used at each intersection of the rings. I liked how both added a little elegant look and went with the theme of a wedding card.
For the card, I used an image from the internet of a bride & groom holding hands. Pixel trace with MTC made cutting the image out very easy. The corner I found in the MTC gallery. The cardstock is a metallic blue that has a shimmer to it.
I used the embossing folder Butterfly Kisses from Craft Concepts on a piece of white vellum. I colored the back of the butterflies with my Spectrum Noir TB4 marker.
Finally the box was a little too deep for a single card so I cut a piece of white cardstock an inch larger in both dimensions, folded it an inch on each side, trimmed the corner pieces, and put it in the box. This lifted the card to the top. The ribbon is threaded through small slits I made in the bottom of the box and tied on top.

I am entering this in Ashley's Welch Creations Challenge #7, the ABC DT Challenge "Graduation or Wedding" card,  and the Cardz TV Challenge #109 "Say I Do"

By the way, the wedding was beautiful. Have a blessed day!

Thursday, May 24, 2012

Get Well Fast

I like sketch challenges but I don't participate as often as I would like. I have started following Allison at Stampin' When I Can. She has a weekly post where people can add their sketch challenges. It's great to have so many to choose from.

Yesterday I had some time to make a get well card for a little boy who had surgery. I followed the Mojo Monday Sketch 242. I used an image from LD's Fast Car graphic set. The lettering was done with Silhouette Studio. I'm not real happy with the button. I thought I could put a trophy but didn't find what I was looking for. Fisher and I included a Hot Wheels coloring book, crayons, and a Hot Wheel for him to enjoy while he is recovering.

Thanks for the visit.

Have a blessed day!

Sunday, May 6, 2012

You Make the Grade

In January I took a position as an instructional high school math coach. My desire is to assist teachers in their professional development. I have been asked several times if I like it better than teaching. It's like asking if I like the beach or the mountains. They are both beautiful and wonderful in their own way. The difference between the jobs has been that I had close to 14 years of teaching. I understood my job and what I was expected to do on a daily basis. Now, I am learning about my new job and not always sure what is expected or how to do it. I'm enjoying the challenge and know that I have more to learn.

Why am I sharing about my new job? This past month I planned and implemented a Lesson Study. This gave the opportunity for a group of teachers to come together and plan a lesson. Afterwards, one teacher taught the lesson while the others observered and collected data. We then debriefed the lesson and made adjustments. It was successful and there are plans to continue this practice next year.

I wanted to make a card for the teacher who opened up her classroom and taught the lesson. She did an awesome job! I chose to use a sketch from Kathy's Waffle Sketch.
Here's my take on the sketch. I used My Favorite Things Pure Innocence You Make the Grade stamp. I wanted a soft look to the girl so I used colored pencils. The papers are from DCWV Cafe Mediterranean. I really liked the orange. The flowers are Prima and teh apple is a button from my stash.

Thanks for visiting. Have a blessed day!

Monday, April 9, 2012

Altered Giant Clothespin

I have another pictorial for you today. I altered a giant clothespin as a gift for the members of the math leadership team in my county. This year they have worked hard to provide professional development and leadership for our county. Let's get started!

The materials I used are: patterned paper, giant clothespin (found at Michael's for $1), foam brush, x-acto knife, Mod Podge, brayer, bone folder, and nail file (not shown).
Start by cutting a rectangle large enough to cover the face of the clothespin. I placed the clothespin on the paper, traced, and cut it out. Don't worry if it is cut too big. We will trim it later. Using the bone folder, I made a crease in the paper to show where it needed to be cut to divide the paper into the upper and lower portion of the clothespin. (Wow, my bone folder looks dingy.)


I just used a pair of scissors to cut the paper. You can see in the picture below how it divides the paper into the two portions.
Next, paint a thin layer of the Mod Podge to the face of the clothespin using the foam brush.
Place the pieces of paper on the face and then use the brayer to get rid of any bubbles. (Be careful when applying pressure to the clothespin or it may go flying across the room.)
After the Mod Podge has had time to dry trim the excess paper using the x-acto knife. (I realized when editing the pictures that I did not stay consistent with which clothespin I was using as a model. Thus, you now see the green one instead of the blue.)
Use a nail file (or fine sand paper would) to file the edges. This made a big difference in the final project. It created a smoother transition from the paper to the painted wood. (Do you like the file? Another $1 find at Michael's.)
Apply a layer of Mod Podge to the top to seal the paper. This should prevent fading and possible water damage. You can do 2 or 3 layers if you wanted. (Again, I have snapped a picture of a different pattern.)
Here are all of the different patterns and clothespins. I used two paper companies: DCWV Linen Closet Stack & All Dressed Up Stack; My Mind's Eye Ooh La La Stack, Fine and Dandy Stack, and All Boy Stack. There are 14 total clothespins.
When I originally purchased the clothespins I thought they would be great for holding pictures or notes so I made a quick note to include. The apple is from Lettering Delights It Feels Like Autumn. It has a magnet on the back so the teachers can remove it and keep it. The note card was designed in the Silhouette Studio and cut out with the Cameo. I used an EK Success puch for the paper edge and a Studio G stamp for the thanks!
Here are the final products. I really had fun making these and they were pretty easy to do. I'll give them out tomorrow at our monthly meeting.
Thanks for visiting and I hope this inspires you to alter something. I would love to hear about your projects.
Have a blessed day!

Sunday, April 8, 2012

Birthday Flower

My niece turned one and so I made her a birthday card. The flower is from the Mulberry Lane Too svg from Lettering Delights. I brought it into the Silhouette Design software, traced several times for the different layers, and then cut them out.
I used my Cuttlebug to emboss the flower with Swiss Dots folder. For the stem and leaves I simple used an embossing tool to create the vines.

Have a blessed day!

Wednesday, April 4, 2012

Easter Treat Buckets

For my birthday last month my DH got me a wireless printer and the Silhouette Cameo. I had been talking about how much easier it would be to do print and cut projects. I had been able to do it with my Cricut but it was not an easy process. He listened and totally surprised me.

Here is my first project using my new tools. I found these cute little buckets in the $1 bin at Walmart so I snatched up 5 of them for Fisher's teachers and ladies at school. 
Although I didn't do anything to the bucket (they came with the sticker on the front) I did create several little goodies to fill it up.
These are cranberry walnut chocolate granola clusters. The label was created with the Lettering Delights Easter Beasties. I used a 3"x 2.5" rectangle and designed the image in the bottom half. The Silhouette Cameo smoothly cut out the rectangle which I then folded in half and stapled to the bag.
These jelly bean bags were made the same way using Easter Beasties as well. Fisher picked out the saying "You Crack Me Up" which was one of the graphics provided in the set.
For the cards I used the chick from the Animal Buddies set from Lettering Delights. The scallop was cut from a nestability and the frame was embossed using the Cuttlebug. The stamps are Studio G Easter set.
I purchased chocolate bunnies and covered the boxes. Again the quote is from LD's Easter Beasties. The paper is from DCWV The Sweet Stack.
I included a Cadbury egg and some other pieces of candy in the bottom. Here are the finished buckets. We delivered them this morning.
I want to say a big THANK YOU to Jin Yong of Under A Cherry Tree. I have learned so much through her video tutorials. Take a look. She has some wonderful projects.

Have a blessed day!