Background

Showing posts with label holidays. Show all posts

Monday, October 29, 2012

Classroom Halloween Treats

October has been a very busy month and last week was the busiest. I started with staff development for all of the high school math teachers in my county on Monday. A PLC session for Course 1 teachers on Tuesday. Then I traveled to the state Math Leadership Conference on Wednesday, followed by the state math conference on Thursday & Friday (of which I had a part in planning). I also presented two sessions. Saturday I coordinated the Fall Festival at the church consisting of a Trunk or Treat, hot dog supper, hayride and bonfire. On top of all that I started getting sick. Spent the entire day in bed on Sunday and went to the doctor today.

Feeling much better, I finished the classroom treats for my son's classroom. I found this idea on Pinterest and my son thought it was hilarious. Using a large container of cheese puffs, we filled small snack bags. (We also discovered that our little dog loves cheese puffs.)


I used Frank's Friends Alpha from Lettering Delights for the pumpkin and designed the entire card in Inkscape. I imported into Silhouette Studio, enclosed with a rectangle, filled the page, and did a print and cut.


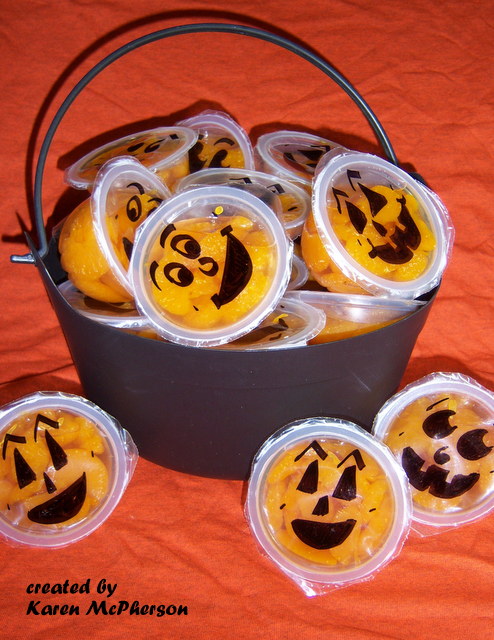
I couldn't resist the second project. (Again, I pinned it on Pinterest.) I purchased mandarin oranges in individual containers and used a Sharpie to draw faces.

That's all the projects I have for today. I have a few planned tomorrow for my colleagues. Thanks for dropping by and have a blessed day!

Wednesday, April 4, 2012

Easter Treat Buckets

For my birthday last month my DH got me a wireless printer and the Silhouette Cameo. I had been talking about how much easier it would be to do print and cut projects. I had been able to do it with my Cricut but it was not an easy process. He listened and totally surprised me.

Here is my first project using my new tools. I found these cute little buckets in the $1 bin at Walmart so I snatched up 5 of them for Fisher's teachers and ladies at school. 
Although I didn't do anything to the bucket (they came with the sticker on the front) I did create several little goodies to fill it up.
These are cranberry walnut chocolate granola clusters. The label was created with the Lettering Delights Easter Beasties. I used a 3"x 2.5" rectangle and designed the image in the bottom half. The Silhouette Cameo smoothly cut out the rectangle which I then folded in half and stapled to the bag.
These jelly bean bags were made the same way using Easter Beasties as well. Fisher picked out the saying "You Crack Me Up" which was one of the graphics provided in the set.
For the cards I used the chick from the Animal Buddies set from Lettering Delights. The scallop was cut from a nestability and the frame was embossed using the Cuttlebug. The stamps are Studio G Easter set.
I purchased chocolate bunnies and covered the boxes. Again the quote is from LD's Easter Beasties. The paper is from DCWV The Sweet Stack.
I included a Cadbury egg and some other pieces of candy in the bottom. Here are the finished buckets. We delivered them this morning.
I want to say a big THANK YOU to Jin Yong of Under A Cherry Tree. I have learned so much through her video tutorials. Take a look. She has some wonderful projects.

Have a blessed day!

Thursday, April 21, 2011

Easter Treat Boxes

Last week Kristy at Craftin' On My Door posted this cute idea and I just loved it. Go take a look at her creation here. The challenge for me on this was using Tags Bags Boxes and More. I got the cart on my Gypsy last fall when there was a promotion. I don't have the handbook and I wasn't sure which cut would create the box I needed. I ended up using the matchbox cover and box. However, I assembled it like a book where the cover opens up instead of the drawer sliding out. I used small plastic bags and filled them with the candy so I didn't have to bother with an acetate window. I printed the label from the computer and used a Martha Stewart 1" scallop punch for the background paper. The ribbon is American Crafts. One of my colleagues is following the Weight Watchers diet so in support of her I made this box. I found a small snack bag of carrots and made the box a little bigger. The bunny is from Gypsy Wanderings embossed with Divine Swirls. The grass is from Create a Critter.

I still have a few more projects to go. Saturday is the Easter Egg Hunt at church. I am making cupcakes for a snack and was going to make decor to go on top. Thanks for visiting and have a blessed day!

Monday, April 18, 2011

Easter Basket

Saturday my SIL called me to see if she could visit and if I could help her in decorating my 1 year old nephew's Easter Basket. She had picked up this bright little box at Target and thought it would be just the right size for the little man. When she went to AC Moores to look at embellishments she went into a little sticker shock. She then remembered "Karen has a cricut." I was more than willing to assist. (Really, it just takes a small suggestion to get me to craft, especially when it is for others.) The name is a print-n-cut from LD Hodgepodge alphabet. The frog is from Frogs and Kisses SVG set. The eggs are cut from patterned paper using the Peep SVG. The other little critters are from a sticker set she did buy. It all goes well together. On these two sides, there are more eggs. The chick and bunny are from LD Easter Beasties SVG set. The grass is from the Plantin Schoolbook cart.
I used the cricut, MTC, Lettering Delights, a cartridge, and stickers to create the images. My SIL put it all together. I think she did a marvelous job. Here are close ups of each side.


Thanks for visiting and have a blessed day!

Saturday, April 16, 2011

Easter Egg Card

During my latest visit to the MTC discussion forum I found the egg card cut file from Shelly aka paperflowers and the cross image from Suzan. I put them together and made this card for my grandmother. The cardstock is Recollections. The pattern paper is DCWV. I added some stickles for a little glimmer.
I embossed the cross and used a stipple brush to give it texture and depth. The flowers and ribbon are from my stash.
Thanks for visiting. Have a blessed day!

Sunday, February 27, 2011

Belated Valentine's Post

Let me start with the card Fisher gave to Rylie at church. What you must understand about this relationship is that my son is 5 years old and Rylie is a freshman in college. He picked out the image from the Lettering Delights "Love Pets." This was my first Print-and-Cut card. It was so easy with the Make the Cut software. I added the google eyes, some glossy accent to the hearts, and the ribbon. The background paper is from DCWV.


This next project was a few weeks in the making. I was inspired by an idea I saw in a magazine (can't remember right off which one) to use a miniature chocolate for the body of a robot. I decided to use the Robots cartridge to make these Valentines for my son to give away at preschool. I wrapped the miniature chocolates in spare design paper and used my Cuttlebug to emboss the background paper. They were just too cute especially with the different size eyes. I was proud of Fisher. He wrote each of his classmates name and signed each card. He was very excited to hand these out.
Here is a closer look at the girl and boy cards. By the way, the heart is a Creative Memories punch and the "Hello Friend" stamp is Studio G clear stamp.


For my colleagues at work I chose to use the Lettering Delights "Love Pets" again with the PNC method. Did I tell how easy I thought this was :) Each tag has a magnet on the back and is attached to a goody bag filled with chocolate and candy.


I chose to use the Lettering Delights "Monster Love" for my DH's card. The border at the bottom is an EK Success punch which has quickly become one of my favorites.


I really wanted to do somethiing very special for my mom's card. I have made a tri-shutter fold card. This allowed me little canvases to be creative.

See the little inchie down in the bottom left corner--- love it!

The butterflies are a Creative Memories punch. They were the last thing I added and it really made the card pop. I hope my mom realized that the heart at the top right was a magnet.

Thanks for taking a look. Although Valentines Day has come and gone I hope this inspires you to send a note to the one(s) you love.

Saturday, January 1, 2011

Christmas Ornaments

I have a problem with procrastination. I purchased these glass ornaments in September with full intentions of having them made way before Christmas. Well, it turns out I was making them the night before I was going to give them to the teachers I work with. Add to it that I haven't made this post until a week after Christmas. I guess better late than never.I used the Christmas cart for the angel, cross, and tree. I used the Its Cold Outside cart for the snowflakes and Very Merry Tags for the JOY. I cut each out using vinyl, adhered it to the glass, and applied etching cream. I am always worried as a clean the cream off that it hasn't worked because I can't see the image. It is not until I remove the vinyl that I can tell the difference. Hope you enjoy and have a Happy New Year!

Saturday, October 23, 2010

Halloween Crafts

Today I worked on special treats for Fisher's teachers. They are three wonderful ladies and I enjoy making them little favors to let them know I appreciate what they do. I found these plastic orange containers at Walmart for 4 for $1. I decorated them using black vinyl from Vinyl Expressions. After decorating each side I filled it with candy corn, miniature Hershey bars, and carmels. I also created popcorn wrappers to go around a bag of microwaveable popcorn.

I found clear plastic bags used for storing homemade breads at the grocery store and they have been perfect for packaging these and other goodies I have made. I found the ribbon on sale at AC Moore which I used on the bag and on the popcorn wrapper tag.

These are the four sides to the container. I used the Make the Cut program and images from the gallery to design each side. I cut all of it with my Cricut.


These are a few images of the popcorn wrapper. Each wrapper starts as a 6"x 12" sheet of orange cardstock. I wrapped it around and glued it together. Fisher signed the back of each wrapper and then we decorated the front. I used a tag punch from Creative Memories for the black tag and stapled a piece of the ribbon to the top. Next I cut the yellow tag using a die with my Cuttlebug. The pumpkin is cut from one of my Cricut carts and I used a stamp from Peachy Keen stamps for the face.


Thanks for taking a look and have a Happy Halloween!

Thursday, February 11, 2010

More Valentine Cards

I have really enjoyed the time to make cards again. There for about 4 months I was swamped with work, school, family, and holidays that I didn't touch my craft area. The past month I have found so much needed time to indulge. As the title of my blog implies - crafting is a retreat for me.

I have made more Valentine cards. I have even addressed and plan to mail tomorrow (especially if I want a Saturday delivery.) I love these cards. In November I went with the ladies from my church (and my DH who graciously provides chauffeur services) to Pigeon Forge, TN. There is a huge Scrapbooking Store and a clearance store. I found this fabulous DCWV stack called All Dressed Up. The papers are marvelous and full of glitter. Those papers were my inspiration for these cards. I hope you enjoy.
I used my punches on this card from the circle, heart, and scalloped edge.
The hearts are cut from the Doodlecharms cart. Don't you just love the pom-pom ribbon I picked up for $1 at AC Moore?
Have you ever made a cut that didn't work for your project but you held on to it for some reason? This boy and girl cut is from A Child's Year and it was too big for the project I was working on. I put it away in a box I have for 'spare' cuts. It was perfect for this card. I used some glitter pens to color the flowers and a pink bow in the little girl's hair. I wrapped black ribbon on the bottom and tied a pink ribbon for accent.
This one is a lot like the first. I really like the simple phrases to add to cards. I find many of them in the $1 bin at Michael's and AC Moore. The clear stamps have certainly made stamping more affordable. (If you ask my DH he may say it made it possible to buy more stuff.)
Well, Happy Valentine's Day everyone.

Tuesday, February 2, 2010

Love Bird

Today I took on the challenge from 2S4Y: Kazan's Sketch 45.

I made a Valentine card for my Grandmother. I cut the bird from the Indie Art cart and pattern paper from the Bloom and Grow pack from My Mind's Eye. I used some stickles to make the bird shine. I embossed a vellum circle with my cuttlebug and wrapped some feathery type yarn around the outside of the card. I stamped the LOVE phrase on a leaf cut from a cuttlebug die.

Thanks for looking and have a blessed day.